Showing posts with label hardware. Show all posts

Tuesday, November 6, 2012

Cremonee

Huh?

Exactly what I said when I first heard the word on Amber's blog...

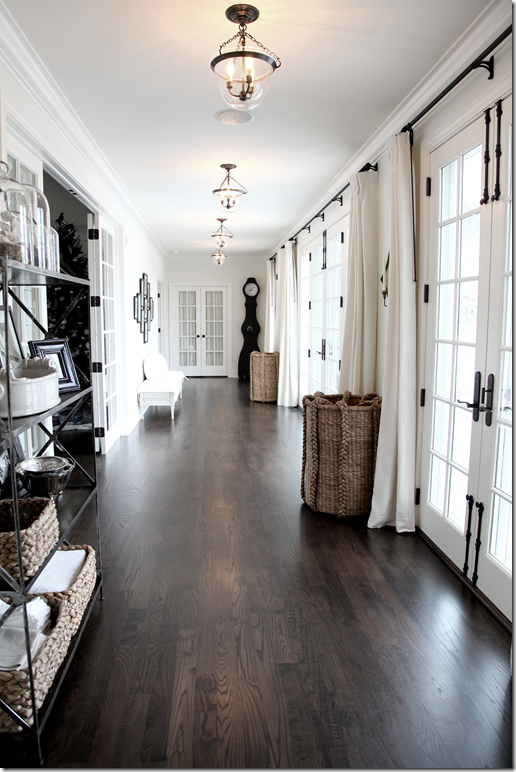
But now that I know what they are I really want some cremonee bolts for the french doors in our house.

via Amber Interior Design

Via Cote de Texas

Via Steve Snider

Via Pinterest

Back to the hardware store we go...

Amy

Monday, August 20, 2012

Mailman Approval

Throughout our renovation we have had a bit of a rocky relationship with our mailmen. You can't completely blame them since they have been having to search for the mailbox's ever changing location for the past year. For the past month or so they have resorted to simply throwing the mail onto the front step not even bothering to search for the mail box...

So when we received this note scribbled on the back of an envelope last week, it was pretty rewarding...


It is a pretty cool mail box if I do say so myself!


Amy


I ♥ comments...

Friday, July 20, 2012

Mail Box is in the Mail!

After a lot of hemming and hawing (and a lot of general procrastination...) we finally got around to ordering a mail box!

In the end we decided to be brave and go with a glass mail box like the one I spotted on Pinterest.

Via Pinterest

I scoured the Internet trying to find one for a reasonable price that would ship to Canada... Why is everyone so afraid of shipping to Canada?

Eventually I found one on eBay for $26... unfortunately shipping to Canada was $45. Ouch.

Why does anyone who does ship to Canada see it as justification for highway robbery?!!?

Via Lucky Rare Finds
 
However as I continued to shop around, I realized that anything beyond a basic mail was going to cost at least $60 from Pottery Barn, Restoration Hardware or even Home Depot.
 
All the sudden, $71 didn't seem so bad for such a unique mail box so we broke down and ordered it.

It still does not mean that I approve of charging an arm and a leg for shipping to Canada. After all Calgary is no further from North Carolina than Los Angeles!

Amy

Tuesday, June 26, 2012

How To: Remove Paint from Hardware

When trying to restore an old house, paint removal is a common occurance. We went through gallons of paint stripper taking the paint off doors, door trim, the stairs and the fireplace brick. The typical paint removal process went something along the lines of:

Soak in paint stripper for a couple hours...
Scrub with steel wool and a wire brush...
Take Advil for pounding headache...
Soak again...
Scrub again...
Vacate the house due to the intolerable level of noxious fumes...

That was until I read a post by Mrs. Limestone about boiling off paint using nothing but water and baking soda. Needless to say I was extatic - anything that avoided paint stripper was worth a try.

So when it came time to remove paint from our cast iron vent covers, I set myself up in the kitchen to try 'poaching' the paint off. The results were not immediate, it took several iterations of boiling and scrubbing to remove the multiple layers of paint and it still did not remove 100% of the paint from the recesses and detailing but overall I was impressed.

I believe it would work extremely well on metal without much detail such as the door plates Mrs. Limestone did. I will definetly be giving this a try in the future before I ever reach for the paint stripper again.


Materials:
  • Large pot
  • Water
  • Baking Soda
  • Paper towel, rags, newspaper
  • Rubber gloves
  • Tongs
  • Wire brush
  • Steel wool
  • Scraper or putty knife

Step 1: Preparation

Locate a pot large enough to hold the hardware - make sure it is not a pot you intend to cook in ever again! I used foil baking pans purchased for $1.50 from the grocery store, which I doubled up just in case.

Prepare a work surface near the stove - you will not want to travel far with the hot, wet hardware. Protect the surface with old rags or newspaper.

Remove any loose peices or screws from the hardware.

Step 2: Simmer

Place the pot on the stove. Put the hardware into the pot and fill with enough water to cover. Add baking soda to the water - Apartment Therapy suggests using 1/4 cup of baking soda for every quart of water but this process will also work without any baking soda at all.


Bring the water to a gentle boil and simmer for 15 to 30 minutes. The water will turn murky and you will see the paint start to bubble off the hardware.


Step 3: Scrub

Remove the hardware from the water with tongs and place on the prepared work surface. Wearing rubber gloves, immediatly start scrubbing the paint off with what ever seems to work - steel wool, wire brush, paper towel. Once all the loose paint has been worked off, rinse under running water and wipe with paper towel.

Step 4: Repeat

Repeat as necessary to remove all the paint.


Step 5: Finish

After all the paint is removed, rinse and dry thouroughly. Clear coat or polish the metal to prevent corrosion. We had our vent covers nickle plated.


Amy

Thursday, March 15, 2012

So Bright I Need Shades

We were able to pick up our freshly nickle plated return air vent covers from Alberta Plating last week.

They turned out a little shinier then either of us had envisioned!

Before

Stripped

Nickle Plated

When we first saw the covers, we were actually worried they were too shiny but once they were installed they blended perfectly with all of the other brushed nickle finishes in the house.

Dinning Room
Bedroom
  
Bathroom

We are both extremely happy with how well the nickle plating turned out. Especially how it restored all of the decorative detail.


The best part... we will no longer constantly be retrieving dog toys out of the return air vents!

Amy

Friday, March 2, 2012

Mail Slot Rescue

When we bought the house, the inner front door had a flimsy plastic mail slot. When we re-finished the door the first time several years ago, we found a vintage cast iron mail slot on eBay. Unfortunately it had been coated with multiple layers of black paint and the worn black finish was just not going to cut it against all of our shiny new bronze hardware.

Dave sandblasted off all of the existing paint - thank goodness for friends who have sandblasting machines - exposing the bare cast iron below. While removing the paint did accentuate the text on the mail slot, unfortunately the grey cast iron didn't match the new door hardware any better than the previous black.


Spray paint to the rescue!

I had recently seen some posts on Young House Love where they had spray painted door hardware, patio furniture and furniture legs oil rubbed bronze - or ORB as they call it - so I thought it was worth a try.

Our door hardware is not actually oil rubbed bronze. The finish is referred to as "medium bronze" - which is a matte black-brown with highlights of gold on the edges. Over time it is supposed to wear to reveal more gold and develop a nice patina... unfortunately no one sells a single spray paint colour that meets that description. Believe me I searched everywhere.

So in order to replicate the "medium bronze" finish, I had to get creative.

I started with a coat of gold Rustoleum Universal Metallic "True Gold". Then I applied a coat of Rustoeum Universal Metallic “Oil Rubbed Bronze” - the same shade used by Sherry at Young House Love.


In order to get the matte finish, I then applied a thin coat of Tremclad Flat Black trying not to completely cover the bronze.


Three coats of spray paint = a lot of paint fumes!

To finish it all off, I sanded the edges with fine grit sandpaper to reveal the gold hues underneath.

Viola! A medium bronze mail slot!


Sure looks better than the green masking tape that had been temporarily blocking drafts.


Now I just have to convince Dave to install it.


Amy

Tuesday, February 14, 2012

Valentine's Day Bling

Last year for Valentine's Day, we treated ourselves to a shiny new chrome faucet for the upsairs bathroom.

Emperor Faucet, Baths of Distinction


Keeping with the tradition, this year we decided to splurge on getting the cast iron return air vents plated with a brushed nickle finish to match the rest of the new hardware in the house.


Dave dropped them off at Alberta Plating and they should be ready in two or three weeks!

Amy

Tuesday, January 24, 2012

Renovating with Baking Soda

When trying to restore an old house, paint stripper seems to make a frequent appearance. We have already gone through gallons of the stuff taking the paint off doors, door trim, the stairs and the fireplace brick (which we ended up tearing out anyways...)

We have recently been inundated with paint stripper fumes all over again as we try to restore the return air vent covers to their former glory.

We were blessed with having seven beautiful original cast iron vent covers in our house. But were cursed with the fact that they had each been painted several times over the last 100 years to the point where they were no longer operational.

Since the bright yellows and muddy browns no longer work in my bright white house (and we would like them to actually function), all of the paint had to go.


Because they are so large and intricate, the only reasonable method we found to take off the layers of paint was soaking them in buckets of paint stripper. It was a horrible process.

Soak in paint stripper for a couple hours...
Scrub with steel wool and a wire brush...
Take Advil for pounding headache...
Soak again...
Scrub again...
 Vacate the house due to the intolerable level of noxious fumes...  

Then I happened to read a post by Mrs. Limestone about boiling off paint using nothing but water and baking soda... anything that avoided paint stripper was worth a try.

So one night last week I set myself up in the kitchen to test 'poaching' the paint off of the vent covers.


Sure enough after about an hour of simmering on the stove, combined with a little bit of scrubbing, the majority of the paint was gone!


Still a lot of polishing is required to make them shine but that is nothing that a little sandblasting won't fix!

Amy

Wednesday, January 11, 2012

Mail Box Search


We have been scouring the internet and hardware stores for the last couple months trying to find the perfect mail box... the old dented brass one is just not going to cut it. 


I keep picturing a blue enamel mail box to match our house numbers, preferably a small vertical one, but have not been able to locate one any where.

Ram Sign House Numbers
Like this but in blue...

I have been contemplating buying one and painting it to match but we don't want to drill holes in the siding for something that might not be a permament solution.

Then I strumbled across a vintage glass mail box on Pinterest (next to blue enamel house numbers none-the-less!) and I was intrigued... The top matches our new bronze hardware, it is small and vertical, it is not too ornate and it is definetly different!

Via Pinterest

But I am torn - do you think it is weird for the neighbours to be able to see your mail?

Amy

Saturday, November 12, 2011

From Denmark with Love

As a surprise for David I ordered a handmade enamelled house number from Ram Sign in Denmark.


I wonder if the postman will approve?

Amy

Thursday, August 18, 2011

Door Hardware

Yup, we did it again. We changed our minds.

This past weekend we headed to our favourite hardware store, Banbury Lane, to find a new handleset for the inner front door and two french doors on the back of the house to match the handleset we bought for the front door.


Sandcast Bronze Rectangular, Emtek

We have decided to use the dark oil-rubbed-bronze colour on the exterior of the house to contrast the light yellow siding but want to maintain the brushed nickle throughout the interior of the house which meant we needed something beyond what is available on the shelf in Home Depot. Thankfully the people at Banbury are beyond helpful and we were quickly able to pick out a Sandcast Bronze set to go on the outer side of the doors and a brushed nickle plate with a traditional crystal knob for the inside of the doors.


Sandcast Bronze Rectangular, Emtek
Old Town Clear Knob, Emtek

Colonial Plate, Emtek

However, when we got home we began to think that it would bring our house to the next level if we had the traditional crystal knobs everywhere...

We had bought standard Schlage hardware for all of the interior doors from Home Depot ages ago, but apparantly Dave can't resist a little bling either, so we quickly folded and added four passage sets and twelve dummy sets with the beautiful Old Town crystal knobs to our order.

Champagne Series, Schlage

Thankfully due to an error when we ordered our interior doors the original hardware was free so our indecisiveness did not cost us much more than a trip to the return desk at Home Depot. We also now happen to have two deadbolt sets , two passage sets and one privacy set, all Schlage Champagne series, removed from the packages and gently used, that are now in need of a new home if anyone is interested.

Amy

Related Posts Plugin for WordPress, Blogger...