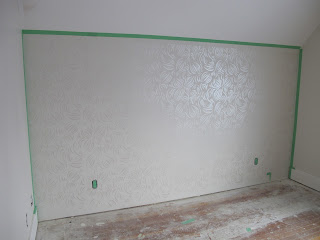
Even though David vetoed the use of wallpaper anywhere in the house, I still wanted to add some interest to the wall behind the bed in the master bedroom to help anchor it against the high ceiling. Therefore we compromised and decided to create "wallpaper" with paint and a stencil.
There is a fantastic selection of stencils available on etsy, I purchased my stencil from Olive Leaf Stencils. We went with the Spring Buds Abstract pattern.
I wanted a subtle tone-on-tone look with just a little bit of shimmer so we used General Paints Powderface (CLW 1034W) as our background colour (the same colour as the rest of the house) with Roman Decorating Amor Metallix in Bianco Pearl for the pattern. I found the Armor Metallix at Bejanmin Moore.
I wanted a subtle tone-on-tone look with just a little bit of shimmer so we used General Paints Powderface (CLW 1034W) as our background colour (the same colour as the rest of the house) with Roman Decorating Amor Metallix in Bianco Pearl for the pattern. I found the Armor Metallix at Bejanmin Moore.
Materials:
- Stencil
- Paint
- Paint tray
- Painter's tape (we love Frog Tape)
- Spray adhesive (optional)
- Small foam roller
- Small paint brush
- Paper towel
- Water
Paint the wall with your background colour. Ensure your base coat is fully dried before proceeding with stencilling. Mask out the area to be stencilled using tape.
Step 2: Stencil
Position the stencil at the top left corner of the wall, ensuring it is plumb and level. Use tape sparingly on the edges of the stencil to adhere to the wall.
Pour a little paint into the paint tray. Apply the smallest amount of paint to your roller. Remove excess paint on a paper towel until the roller is "dry". Too much paint on the roller will cause the paint to bleed behind the stencil and cause blurry edges.
Roll the paint over the stencil with medium pressure - again too much pressure will cause the paint to bleed behind the stencil. Also take care to make sure you do not roll beyond the edges of the stencil.
If you do not get enough coverage, allow the first coat to dry for a couple minutes and then roll on a second coat. It is better to do multiple light coats then thick coats.
Step 3: Repeat
Allow the paint to dry for a couple minutes, then gently remove the stencil from the wall.
Reposition the stencil to the right, taking the time to line up the pattern. If your stencil does not line up perfectly it is ok. As long as the pattern is not too far off it will not show up in the end - just be careful not to repaint over the edges that do not line up. It is important to remember that walls are almost never perfectly straight (especially in a 100 year-old home like ours) so it is better to follow a level line and not the ceiling line or your pattern may end up crooked.
Reposition the stencil to the right, taking the time to line up the pattern. If your stencil does not line up perfectly it is ok. As long as the pattern is not too far off it will not show up in the end - just be careful not to repaint over the edges that do not line up. It is important to remember that walls are almost never perfectly straight (especially in a 100 year-old home like ours) so it is better to follow a level line and not the ceiling line or your pattern may end up crooked.
Step 4: Touch-up
Using a small paint brush (I used an art brush), fill in any gaps in the pattern by hand.
Remove any tape and enjoy the finished product!
For more helpful tips, check out Centsational Girl and Cutting Edge Stencils.


No comments:
Post a Comment